— PAGINATION —
Verify & Export Ads from Magazine Manager
AUDIT
In Magazine Manager, pull ad report(s) for all ads and check that every ad has an Ad # (Order Number) and complete Section information. For any ads missing an Ad #, open the Job Jacket and check/uncheck Ad Arrived to generate one. For any ads that have blank Section information, contact the sales rep and ask them to correct it.
PAGE COUNT
Each signature of pages on the press is 32 pages. You can adjust your page count in increments of 8. We aim to have about 50/50 editorial and advertising.
The Sales Runsheet report in Magazine Manager will give you total page counts for all ads. You’ll need to get page count totals for each Ad Section (ALL ZONES, GV only, HS only, NB only).
Go to: Reports > Report Suite > Sales Runsheet
Search Product: Our Town | Gainesville, current issue, ALL ZONES and GV only sections (separately)
Search Product: Our Town | HS+ALA / NB+JV, current issue, HS only and NB only sections (separately)

IMPORTANT: Make sure the search “Options” match what is shown here in the bottom right.
After each of those 4 searches, click the “Options” button at the bottom of the page and pick “Show Totals”
In the resulting information, make note of the amount shown for “Total Pages”.
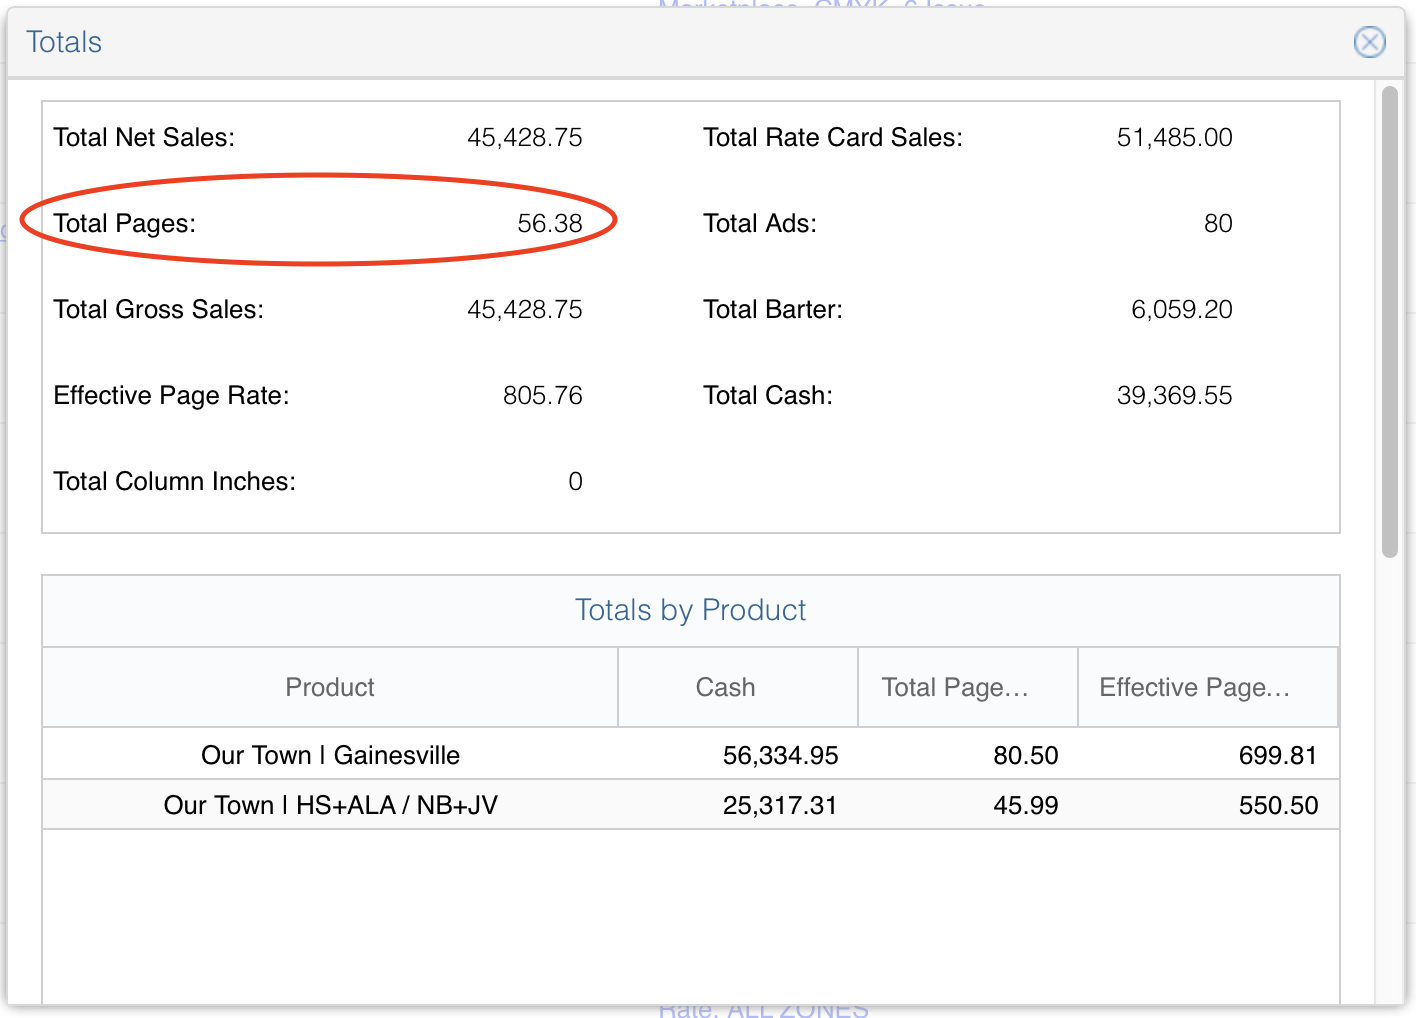
The number circled above is what you want to write down for each of your 4 searches.
Add the page totals of All Zones and either GV only or HS only (whichever is higher) and use that to determine your total page estimate.
For example:
45 pages in All Zones
22 pages in GV only
67 total ad pages
EXPORT AD MANIFESTS
Go to: Reports > Production > Tower Ad Export (OT)

From the results page, select Export from the action menu (if it’s hidden, click the box with 3 horizontal lines next to “Search”.

NOTE: Export might get hung up if you have pop-up windows blocked. You can override this after by clicking the small window icon next to the refresh icon in your browser’s search bar.
MERGE & PREP FOR PAGINATION
Place all 4 exported manifest CSV files into a new folder named “LAYOUT”
Right-click on the folder and select: Services > New Terminal at Folder
Issue this command in Terminal:
cat *.csv >merged.csvQuit Terminal and open the new “merged.csv” file in Excel or Numbers
Find/Replace to change all instances of “CMYK” to “Black
Find/Replace to change all instances of “True” to “Yes”
Find/Replace to change all instances of “False” to nothing (make them blank)
Delete extra header rows that exist from merging
Save as an Excel or Numbers file
Select All (except for header row) and Copy
Open a plain text file in TextEdit and Paste
Save the plain text file as “MESI-productname-issuename” (e.g. MESI-OT-JANFEB20.txt)
AdForce Page Planning
AdForce is the flatplanning tool that you’ll use to set up your ad boxes onto pages in a publication. Each issue of Our Town will require four AdForce documents to be created (one for each ad zone).
I’ve found it’s best to create an empty one with pages named and locked for things like Calendar, Charity, Table of Contents, etc. first, then duplicate that document 3 times and name them appropriately before placing any ads.
Open the AdForce template located in: Production > Shared > CC Templates > Our Town > OT-Layout148.als
GENERAL INFORMATION
In the Layout menu of AdForce, you can Delete or Insert pages to get them to match your estimated total
In the main window, you can double-click the number on any page to name that page (always name the beginning and end of signatures)
You can lock/unlock any page by holding the Option key and clicking on it
Assign two facing pages after page 100 for “Charity”
Assign the pages following those for Restaurant section (you’ll need to count them up – 3 per page)
Assign the pages following those for the Calendar (you’ll need to do the Calendar layout to know your page total for this section)
It helps to grab a hard copy of the last issue for reference on where things fit and how
CREATING ADFORCE FILES FOR OUR TOWN
From the Palettes menu, select “Runsheet”
From the File menu, select “Import Ads…”
Import the MESI file you just created using the “MM Import” setting
Save and close
Duplicate that file 3 times and name them to match each zone (ALL ZONES, GV only, HS only, NB only)

PLACING ADS AND SETTING PAGE LAYOUT
Open the AdForce file for ALL ZONES
Lock all pages that are in switched zone signatures
Open the Runsheet palette
Click the Filter icon and sort by “ALL ZONES sort”
Then click the headers to further sort by Page Number, Guaranteed MM and Notes
NOTE: If you click on the tiny arrow that appears, you can choose “Sort Descending” to push empty results to the bottom of the list.
Click-and-drag from the name of any ad to place it on the page you decide
Place all the ads that have guaranteed placements or other special instructions
Disable previous sortings for Page Number, Guaranteed, etc. and sort by “Size MM”
NOTE: Click the red and blue chasing arrows to select “Collect Unplaced Ads” and it will move any ads already placed to the bottom of the list.
Scroll down to the Restaurant size ads and place those in the pages you reserved for Restaurant ads
From the Palettes menu, select “Layout”
Select “ALL ZONES” from the list on the right and make sure the other options are for All Pages and Distribution
Click Apply — this should automatically place everything else into open pages
Adjust ads by clicking and dragging them around to snap into new positions or pages
Save and close when satisfied (you can always move the ads around in InDesign later)
Repeat process for GV only, HS only and NB only
IMPORTANT!! make sure to lock/unlock the correct pages for switch or all zones AND use the proper filter for each respectively.


